Gmail is one of the most popular email clients and can be set up to send and receive mail through your own website domain. This is especially convenient for the small business owner who would like to send and receive both their personal Gmail and business emails from the same place. This guide will walk you through the basic steps involved with setting up Gmail to send and receive mail using your domain.
Setup Instructions
- Log into your Gmail account.
- Click the Gear in the top right and select ‘Settings’ from the drop down menu.
- Select the ‘Accounts and Import’ tab.
- Click ‘Add a mail account’ under the section ‘Check mail from other accounts’.
- Enter the email address you would like to receive mail from and click ‘Next’.
- Select ‘Import emails from my other account (POP3)’ and click ‘Next’.
- Fill out the settings for your mail account and click ‘Add Account’
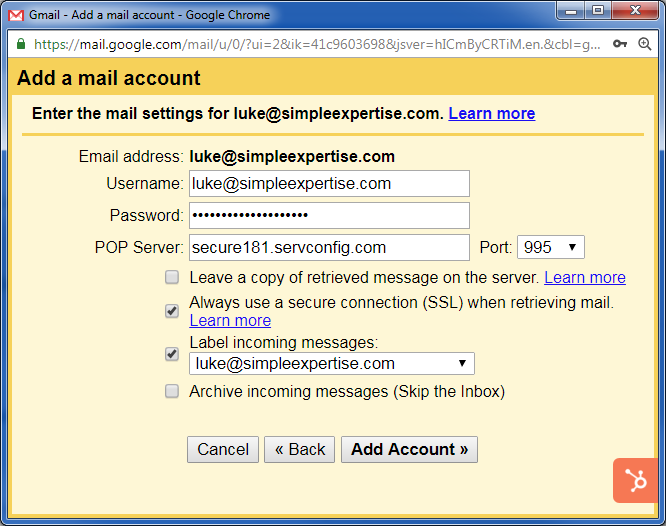
- Username: your email address
- Password: your email password
- POP Server: your secure mail server address
- Port: 95
- Check ‘Always use a secure connection’
- You may choose to apply a label to your incoming messages; this will make it easy to see all the messages received to this account.
- At this point your Gmail has been setup to receive email from your domain. To also be able to send mail select ‘Yes, I want to be able to send mail’ and click ‘Next’.
- Ensure ‘Treat as an alias’ is checked then click ‘Next Step’
- Fill out the form and click ‘Add Account’
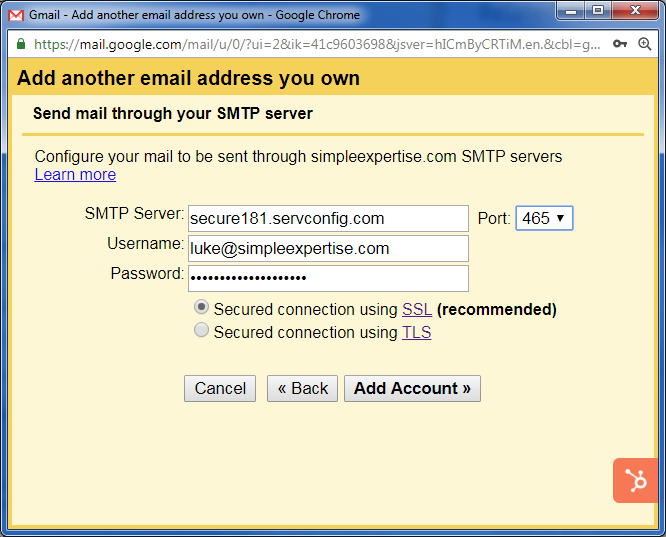
- SMTP Server: your secure mail server address
- Port: 465
- Username: your email address
- Password: your email password
- Select ‘Secured connection using SSL’
- At this point you will be required to enter a verification code sent to your domain email address. Because we have already configured your Gmail to receive mail from this account it will show up in your inbox the next time the mail is checked. To force Gmail to check mail now instead of waiting, return to ‘Settings’ – ‘Accounts and Import’ then click ‘check mail now’ under ‘Check mail from other accounts’. These steps can be repeated at any time to force Gmail to check for new mail.
- Access the Gmail Confirmation email from your inbox to retrieve the confirmation code. Enter the code into the form and click ‘Verify’
- Congratulations! You have successfully configured Gmail to send and receive emails using your domain.
Additional Features
Now that you have setup your account, Gmail will periodically check your domain for new emails and display them in your inbox alongside your other emails. When composing a new email, you can choose which account to send from by clicking the dropdown arrow beside your email address in the ‘From’ line. If you would like your domain account to be the default ‘From’ address, return to ‘Settings’ – ‘Accounts and Import’ – ‘Send mail as’ and click ‘make default’ next to your new address. We strongly recommend you consider selecting ‘reply from the same address the message was sent to’ at the bottom of the ‘Send mail as’ section, which will help avoid unintentionally mixing your personal and domain emails in the same conversation.